Frogatto & Friends

Frogatto sprite

Frogatto & Friends is an action-adventure platformer game, starring a certain quixotic frog.
We're an open-source community project, and welcome contributions!
We also have a very flexible editor and engine you can use to make your own creations.

Graphics News #18

May 10th, 2012 by Jetrel

I’ve been a bit remiss in posting these regularly, so here’s getting back into it: I’ve recently redrawn the cave tiles.

There were a number of haphazard bits to the old effort, probably the single biggest thing that was poorly improvised was the side-wall tiles, which had stalagmites jutting out at an angle. I wasn’t yet comfortable enough with our crazy panoply of tile<->tile combinations to attempt continuous columns of stone that carried through from tile to tile, and instead tried to hide the tile transitions with organic noise. This time around, I’ve improved enough to grapple with that, so I’m able to make the tiles look much more like the basaltic columns I’d intended for them to look like. (We’ve also moved to a more deliberate use of a small amount of perspective on the upper surface of solid areas, so this change also incorporated that.)

Here is a series of before/after shots:


FacebooktwitterredditmailFacebooktwitterredditmail

Cube Trains

May 8th, 2012 by DDR

Hello.
Over the past half-year or so, I’ve made a game using the Frogatto engine called Cube Trains. It’s a 3D puzzle game based around building tracks in the confines of the city. You can visit the website over here: http://ddr0.github.com. A picture is worth a thousand words, they say, and I’m not very talkative. Let’s make this post 2153 words long, shall we?

First screenshot of Cube Trains.
Second screenshot of Cube Trains.

Beta video: http://www.youtube.com/watch?v=H7OMc4HwYS8&feature=channel&list=UL
Alpha video: http://www.youtube.com/watch?v=H7OMc4HwYS8&feature=channel&list=UL

Just a side note, in the 0.2.0 release for windows and linux, you’ll need to remove any Frogatto save-files you have saved from their save folder. Cube Trains expects there to be none there when it starts up the first time, though you can rename the save-files and put them back when you’re done. (save.cfg -> save1.cfg, save1.cfg -> save2.cfg, and so on) This problem does not affect Mac users.

The code is available in the cube_trains module of Frogatto, in the more recent git versions.

FacebooktwitterredditmailFacebooktwitterredditmail

How Event Handling in Frogatto Works

May 5th, 2012 by Sirp

I’m going to take a little detour from my series on how to make a game in Frogatto to discuss in detail an important topic to anybody who wants to develop using Frogatto: how event handling works.

Frogatto’s game objects receive ‘events’ frequently. They receive a create event in the first frame they run, a collide_side event when the object runs into a wall, a collide_feet event when landing on the ground, and a jumped_on event when another object lands on top of the object. They even receive a process event that is triggered every frame. There are around 30 built-in events, and more types of events can be added.

Events are the big chance you, as a game developer, have to customize an object’s behavior. When an event occurs on an object, you get to specify any actions the object should make in response.

Frogatto’s event handlers are written in Frogatto Formula Language (FFL). FFL is very different from many other computing languages, such as Python or Lua or Javascript in that FFL is a pure functional language. What this means is that FFL’s entire purpose is to run some calculations and return the results of these calculations. An FFL formula has no ability to directly change the game state.

Huh? How does this work then? What use is writing some code if it can’t actually change anything? Here is how it works: when an event occurs, the game engine evaluates the FFL formula — during this evaluation the game state is completely frozen — and the formula returns one or more command objects. After the FFL has finished running and returned its results, the game engine steps through these commands that FFL returned and executes them.

This might seem like a distinction without a difference, but it’s very important. Note the difference between when the game engine evaluates FFL (without allowing modification of the game) and then, once the FFL is done, executes the commands that FFL gave it. This has the huge benefit of making it so an FFL formula runs in an environment where nothing changes, where everything can be viewed as a mathematical model of the current game state — where one doesn’t have to keep track of the possibility of variables changing during the evaluation of a formula.

Anyhow, enough theoretical talk! Let’s get down to a concrete example. We’ll start with a simple one. Suppose we have an object which steadily moves upwards by 2 pixels every frame, here is how we could make it work:


on_process: "set(y, y-2)"

Every frame, the process event gets fired. The FFL code, set(y, y-2) is evaluated. What is this ‘set’ thing? It’s a built-in function that returns a set command. If the object’s y position was 100 before the event was triggered, the FFL will evaluate to a set command with the information encoded to set the value of ‘y’ to 98.

After the FFL returns this command and has finished, the game engine will execute the command. Executing the command will result in setting the object’s y value to 98, shifting it up 2 pixels. Note that the process of evaluating the formula is part of FFL. Executing the command takes place within the game engine, and there is no FFL involved.

The set function is the most often used function out of an extensive suite of functions FFL has available for generating commands. There are commands for playing sound and music, for spawning new objects, for different graphical effects, for debugging, and so forth.

Note that it is important to understand the difference between an FFL function that returns a value that is useful in FFL, and an FFL function that returns a command. For instance, FFL includes the sin function, which returns a value that is useful in intermediate calculations but doesn’t make much sense to return to the game engine. The spawn function gives us a command which, when executed by the game engine, spawns a new object and is exactly the kind of thing we might return to the game engine.

FFL is a full-fledged programming language, and we can include complex logic in it. Let’s say we wanted to make the object reverse direction every two seconds (i.e. every 100 frames). We could write the event like this:


on_process: "if((cycle/100)%2 == 0, set(y, y-2), set(y, y+2))"

Note how, in FFL, if is just a function. It looks at its first argument, and if its first argument is true, it’ll evaluate to its second argument (the ‘then’ clause) otherwise it’ll evaluate to its third argument (the ‘else’ clause).

I want to dive much deeper into how FFL works, and what can be done with it, but that will wait until a later post. Right now, I want to talk more about the event handling mechanism Frogatto uses.

Like I said, an event handler is evaluated and then after the FFL has returned its results, those results are executed by the game engine. This has some interesting implications. Firstly, FFL can return multiple commands in a list, like this:


on_process: "[set(y, y-2), if(y < 0, set(x, x+2))]"

This will return commands to decrement y by 2, and if y is less than 0, increment x by 2. Note though that since the entire formula is evaluated before any execution occurs, the value for y throughout the formula is the value at the start of the event. This means that if y is 1 before the event occurs, the if condition will fail, because the set(y, y-2) will not be executed until after the event returns.

Consider this code:


on_process: "[set(y, 5), debug(y)]"

debug evaluates to a command that outputs its arguments, in the game window and the console. Very useful for debugging. Note though that it will output the value of y as it was before the event was fired. If you wanted it to output 5, you might do something like this:


on_process: "[set(y, new_value), debug(new_value)] where new_value = 5"

Now consider this code,


on_process: "[set(y, y-100), set(y, y-5), set(y, y-2)]"

Pretty silly code, right? But what does it do? Say y was 100 before the event was called. We will return three set commands, the first will be encoded to set y to 0, the second to set y to 95, and the third to set y to 98. The game engine executes commands in a list in order, so the last command will set y to 98, and the first two commands will in effect do nothing.

One special function is the fire_event function. It returns a command that explicitly fires an event. For instance,


on_process: "[set(x, x-2), set(y, y-2), fire_event(self, 'output_state')]",
on_output_state: "debug(x, y)"

When the process event occurs, commands will be returned to decrement x and y, and then a command to fire an 'output_state' event. These commands will be executed in sequence. x and y will be set, and then output_state will be fired, causing on_output_state to be evaluated. Finally, the debug command returned by on_output_state will be executed, causing the updated x, y to be output.

Note that fire_event is very useful in some situations, but should be used judiciously. Its main purpose is NOT to allow chaining of events like this, but to allow us to fire_events on other objects (e.g. if we hit another object we might want to fire an event on them to know they've been hit).

Hopefully this gives us a nice overview of how the Frogatto event system works. Hopefully, soon, I'll write more about all the features FFL has to offer. In the meantime, you might like to check out our FFL FAQ.

FacebooktwitterredditmailFacebooktwitterredditmail

Developing Games using the Frogatto Engine: Part 2

April 28th, 2012 by Sirp

Gravity and Collision Detection

Last time, we made our hero, Elisa, and gave her a basic slashing animation. Since we’re making a platformer, we’d really like Elisa to be subjected to gravity, and to be able to land on and walk on the ground.

The simplest way to represent gravity is to give objects vertical acceleration. The simplest way to do this is on a per-animation basis. We can add this to each animation:


accel_y: 80

This gives the object acceleration of 80 milli-pixels per cycle^2. The acceleration is set when the object enters the animation. We could also use FFL to set an object’s acceleration in any event, such as by using set(accel_y, 80).

Using this code, I make a little level, containing Elisa, with some ground tiles beneath her. She falls, but she doesn’t have any collision detection logic yet, so she falls straight through the tiles!

Elisa is an object that should be solid. We want her to land on ground tiles, and not be able to walk through them. There is an additional problem with Elisa’s animations from last session: her animations are of different sizes. The game engine keeps the upper-left corner of the object in the same position, but this causes her to jerk forward when slashing.

Both these problems are solved by giving her a solid area. This is specified by specifying a rectangle in [x1,y1,x2,y2] format in each animation:


solid_area: [16,10,32,50],

This specifies the area within the frame which is solid. Naturally this is calculated by loading the image into an image editor and looking at the appropriate co-ordinates for the solid rectangle for an animation.

Once I do this, I start the game, and Elisa falls onto the platform and stands on it! That was nice and easy.

What is important is that we make a solid_area for the attack animation which is the same size as the standing animation, but with the position adjusted appropriately. Frogatto has a notion of an object’s “feet”, which is a pixel position within each animation that is the anchor-point for the animation. The feet of an object are found in the bottom middle of its solid rectangle. This is the point with which it collides with the ground, and the point at which animations are anchored. When an object changes its animation, the feet remain the same place, as does the solid area (assuming the solid areas are the same size for each animation).

We can run the game with the –show-hitboxes option to see the collision area for Elisa:

Perfect — Elisa will now fall, until she lands on a surface, which she’ll stand on. Here is the full code listing:


{
id: "elisa",
is_human: true,
editor_info: { category: "elisa" },
on_end_stand_anim: "set(animation, 'stand')",
on_end_attack_anim: "set(animation, 'stand')",
on_ctrl_tongue: "[set(animation, 'attack')]",

on_process: “if(ctrl_left, set(x, x-2))”,
animation: [
{
id: “stand”,
image: “characters/elisa-spritesheet1.png”,
rect: [4,4,57,57],
solid_area: [16,10,32,50],
pad: 3,
duration: 5,
frames: 3,
reverse: true,
accel_y: 80
},
{
id: “attack”,
image: “characters/elisa-spritesheet1.png”,
rect: [5,180,93,240],
solid_area: [26,16,42,56],
pad: 3,
duration: 5,
frames: 6,
frames_per_row: 3,
accel_y: 80
},
]
}

That is all for today’s lesson. Next time I intend to show you how you can make Elisa walk and jump, and in doing so we’ll step more into Frogatto’s event handling mechanisms, and learn more of Frogatto Formula Language.


Next Page
Table of Contents
Previous Page

FacebooktwitterredditmailFacebooktwitterredditmail

Developing Games using the Frogatto Engine: Part 1

April 24th, 2012 by Sirp

So you want to make a game, and you think the Frogatto engine might be for you? This is the first in hopefully a series of posts which document just how to do that. These posts are targeted at people with some technical knowledge — who know how to run Frogatto from the command line and pass command line arguments to it, know how to edit text files, and have some coding knowledge or who are eager to learn. I will also assume that you have some level of familiarity with the Frogatto Editor (accessible by pressing ctrl+e while in a game of Frogatto).

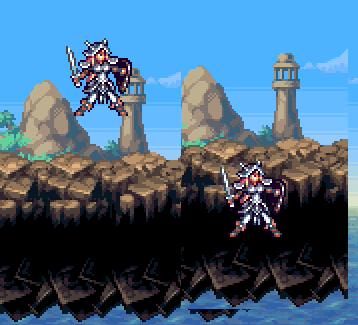
I’m going to develop a simple platform game, featuring a sword-wielding heroine, Elisa, which I’m calling Elisa’s Quest.

To begin with, Frogatto features a module system. You can put your game in its own module, and then when you run Frogatto, you can specify which module you want to use. This allows you to develop your own game without interfering with the core Frogatto game.

To create a module for Elisa’s Quest, we make a new directory under the Frogatto install, in modules/elisa. Then we create a basic configuration file for our module, in modules/elisa/module.cfg using our favorite text editor. We enter this into the file:

{
id: "elisa"
}

This file is the main module configuration file. For now the only setting is to specify the ID of the module, but we are likely to add more settings here later.

Game Objects

In our game, we will want our sword-wielding heroine to jump from platform to platform, battling vampire bats, collecting coins, and avoiding traps of spikes. Each of these things — the heroine herself, platforms, bats, coins, and spikes, are examples of game objects (often just called ‘objects’) that we must define to the game engine.

An object’s appearance and behavior is specified in a single .cfg file that will be placed under modules/elisa/data/objects. It can be placed directly in this directory or in any sub-directory, so if you’re making a substantial game, it’s a good idea to categorize the different objects into different directories.

An object needs a sprite sheet, a png file which contains its art. Multiple objects can share a single sprite sheet, or one complex object might have its images split across multiple sprite sheets. All images will go under modules/elisa/images — which is the directory Frogatto searches for images in.

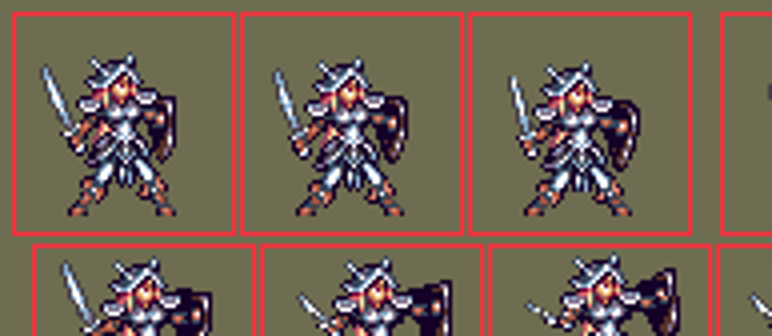
We’re going to start by defining our heroine, Elisa. Here is the sprite sheet for her, which I will put in modules/elisa/images/characters/elisa-spritesheet1.png :

Elisa, in all her glory

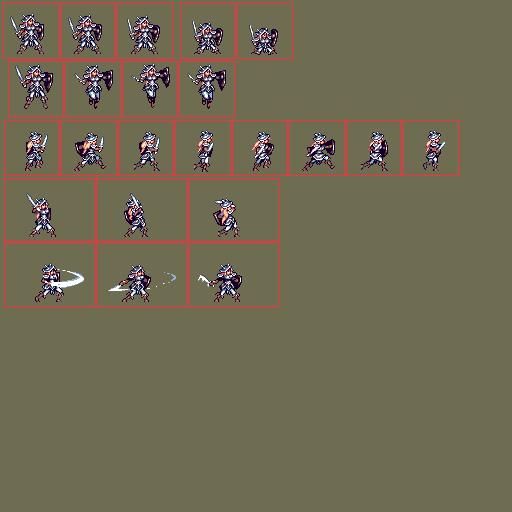
Note that both the background color and the color of the red rectangles around the sprites are special colors (#6f6d51 and #f9303d) which the engine treats as fully transparent. This allows you to organize your sprite sheets, and indicate frame boundaries, though isn’t strictly necessary. The Frogatto engine also fully supports alpha channels, which you can alternatively use for transparency.

Note also the size of the image. All that extra space around it isn’t just arbitrary. Widths and heights of images provided to the Frogatto engine should be powers-of-2 (i.e. 2, 4, 8, 16, 32, 64, 128, 256, 512, or 1024). Here, we’ve padded the image out to make it a 512×512 image. If Elisa was a little shorter, we could have made it a 512×256 image.

Now it’s time to start defining Elisa’s behavior. We create a file in modules/elisa/data/objects/characters/elisa.cfg:


{
id: "elisa",
is_human: true,
editor_info: { category: "elisa" },
animation: [
{
id: "stand",
image: "characters/elisa-spritesheet1.png",
rect: [4,4,57,57]
}
]
}

This is a fairly bare-bones definition of an object. Let’s see what it tells us:

  • The object’s ID is elisa. This must correspond to the filename (elisa.cfg)
  • elisa is ‘human’. That is, she is controlled by the player. In a single player game, there may only be one object in existence at a time that has this flag. Many games will only have one object that has is_human: true.
  • elisa goes into an editor category called ‘elisa’. This means when you want to add an elisa object to a level in the Frogatto editor, you will find her under a category called elisa.
  • All objects must have a list of one or more animations. An animation consists of one or more frames. Right now we just have a single frame animation for elisa. Note that the rect: [4,4,57,57] specifies the top-left most sprite in her sprite-sheet.

This definition of Elisa is written in Frogatto’s Object Notation (FSON) — basically JSON with a few additional features. FSON is used extensively throughout Frogatto as a data language to define the properties of objects.

Adding Elisa Using the Editor

Now we can try out the Elisa object in-game. One of the nice things about Frogatto’s module system is when you run a module you still have access to Frogatto core game data, when you’re first testing your game you can do so, mixing it with Frogatto’s assets, before all yours are fully developed.

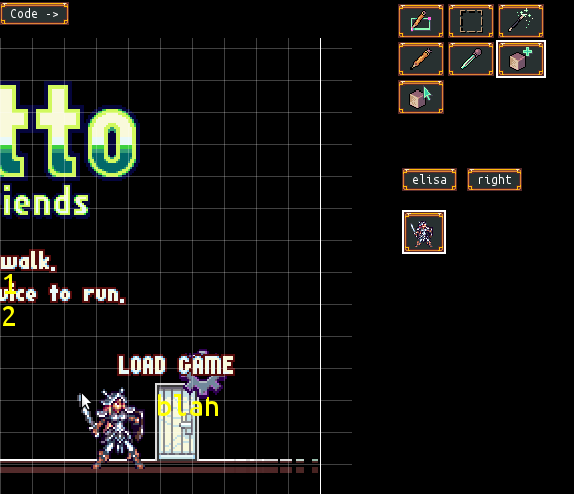
We invoke the game with the --module command line argument: frogatto --module=elisa. This runs the game, loading our module. We press ctrl+e to open the editor, and then we can easily find and add the elisa object to a game of Frogatto:

Elisa in the editor

Now, at the moment, all the elisa object does is stand there, frozen still. We haven’t given her any other behavior yet. If we look at the Elisa spritesheet, we notice that the top three images are all part of a standing animation, meant to make Elisa move a little, even when standing.

Elisa's stand animation

Note how the frames are of uniform size and spacing. This is how the engine expects frames of the same animation to be laid out. An animation definition may contain a specification of how many frames there are in the animation, along with the duration, in game cycles, of each frame. A padding may be specified to show how many empty pixels there are between the frames on the sprite sheet. In this case we have three pixels between frames.

This animation also isn’t meant to be played to the end, and then started over. Instead, it’s meant to be played forward (Elisa inhaling) then played in reverse (Elisa exhaling). Some animations are designed to be played forwards and then backwards, and the engine provides a special reverse property to allow for that.

A little note at this point: we can continue to edit Elisa’s code using our text editor of choice. We can also use Frogatto’s built-in editor by pressing the “Code” button in the editor. If we use the in-game code editor, we will see Elisa update instantly as we make changes to the code. Even if we use an external editor, the game engine will update the changes we make without us having to exit and restart Frogatto! This feature is enabled as long as we are in the Frogatto editor.

Here is the code to turn the still standing frame into a proper animation:


{
id: "elisa",
is_human: true,
editor_info: { category: "elisa" },
animation: [
{
id: "stand",
image: "characters/elisa-spritesheet1.png",
rect: [4,4,57,57],
pad: 3,
duration: 5,
frames: 3,
reverse: true

}
]
}

After making this change, when we play the game, Elisa will play through her animation, but only once. Then she will freeze again, staying in the last frame of her animation. The game engine doesn’t know what to do with her next without some instruction. It might seem obvious: “she should start the animation over again!” — but it’s not so obvious. When elisa finishes an animation involving swinging a sword, we wouldn’t want her to just play that animation over again. Instead, we must provide instruction on what to do, and we provide that instruction through events.

Events

When we think about the behavior we want to specify for an object, much of it revolves around us wanting to specify how the object behaves when something happens. What should the object do when it lands on the ground? When it collides with a bat? When the player presses a button? When an amount of time elapses? When the level starts? These are all events. In this case, we are interested in what elisa should do when her ‘stand’ animation finishes.

We specify what should happen when an event occurs in an event handler. An event handler is a property in FSON which contains a formula that is evaluated when the event occurs. The formula is written in Frogatto Formula Language (FFL). This formula is able to query the current state of the game, and then return some commands. These commands that the formula returns will be executed by the game engine.

In this case, all we want to do is specify that when the animation finishes, it should be played over from the start. That, is quite simple:

{
id: "elisa",
is_human: true,
editor_info: { category: "elisa" },
on_end_stand_anim: "set(animation, 'stand')",
animation: [
{
id: "stand",
image: "characters/elisa-spritesheet1.png",
rect: [4,4,57,57],
pad: 3,
duration: 5,
frames: 3,
reverse: true
}
]
}

Whenever the ‘end_stand_anim’ event occurs on this object, the event handler is invoked, and it returns a command to set the object’s animation to ‘stand’ — which will start the stand animation over from scratch.

Now, let’s make it so Elisa can swing her sword. To do this, we’ll need to define her sword swing animation. We’ll also need to have an event to make her enter the animation. A ‘ctrl_tongue’ event will be sent when the ‘s’ button is pressed (due to this normally being the button which activates Frogatto’s tongue in Frogatto). We will use is to make Elisa swing her sword. However, Elisa can’t swing her sword any time. For instance, if she’s already swinging her sword, another press of ‘s’ should be ignored, so we’ll add some logic to make it so she can only swing her sword if she’s currently in her ‘stand’ animation:


{
id: "elisa",
is_human: true,
editor_info: { category: "elisa" },
on_end_stand_anim: "set(animation, 'stand')",
on_end_attack_anim: "set(animation, 'stand')",
on_ctrl_tongue: "if(animation = 'stand', set(animation, 'attack'))",
animation: [
{
id: "stand",
image: "characters/elisa-spritesheet1.png",
rect: [4,4,57,57],
pad: 3,
duration: 5,
frames: 3,
reverse: true
},

{
id: "attack",
image: "characters/elisa-spritesheet1.png",
rect: [5,180,93,240],
pad: 3,
duration: 5,
frames: 6,
frames_per_row: 3
}

]
}

Note how ctrl_tongue has its code enclosed in an if statement, so the event handler will only cause anything to happen if Elisa is in her stand animation. If she’s already in her attack animation, the event won’t do anything. This is a simple example of the logic capabilities of FFL. Next time I want to explore FFL in much more detail.

I think this is enough for our first lesson — we’ve added an object, and made her perform a few basic actions. We are a little lacking in documentation on the Frogatto engine right now, and I’m hoping this series can improve it, so please feel free to reply with any questins or comments!


Next Page
Table of Contents
← Previous Page

FacebooktwitterredditmailFacebooktwitterredditmail

Developing with the Frogatto Engine

April 21st, 2012 by Sirp

I’ve made a new video which gives a quick walk through of what it’s like to develop with the Frogatto engine.

FacebooktwitterredditmailFacebooktwitterredditmail

Windows Development

April 7th, 2012 by Krista

So you’ve watched Sirp’s awesome video and you’re a windows user and feeling a little left out at not being able to play with all his shiny new toys. Don’t fret any longer there is now a build of Frogatto, featuring the new code editor, object trails, timeline editing and the improved debug console. You can download it from this link Frogatto-dev-060412.exe.  This is a development build and as such comes with the caveat that it may not be stable or things may be missing, but best effort was used to ensure things just work.

So here are some handy things to know to try out the new editing features.

  • Ctrl-E Starts the game editor, you can still play while using the editor
  • Ctrl-P Pauses your game. You need the game to be paused to play around with the trails and to scroll the level around using the arrow keys, instead of controlling Frogatto.
  • Ctrl-D Debug Console. Here is where you can execute FFL expressions.
  • The little button labelled “Code ->” when you’re in the editor lets you look at the code for the currently selected object, changes made to the code will be automatically applied to the running game (how cool is that).
  • In the Code Editor you need to double-click on a number to bring up a slider that lets you play with the value.

FacebooktwitterredditmailFacebooktwitterredditmail

Cool new editor features

April 6th, 2012 by Sirp

I’ve been adding some cool new features to Frogatto’s editor, to make it easy to get instant feedback on how well features in a level work as we add them. Check out this video I’ve made which shows off the new features:


FacebooktwitterredditmailFacebooktwitterredditmail

Frogatto Available for Blackberry Playbook on App World

March 16th, 2012 by Sirp

I earlier posted on our effort to port Frogatto to the Playbook. Frogatto is now available for purchase for $4.99 on the Blackberry Playbook. Find it on Blackberry App World here!

FacebooktwitterredditmailFacebooktwitterredditmail

Frogatto Fan Art (by The Arty Squid) Part 2

March 13th, 2012 by Jetrel

We delayed this post for a couple days to give the blackberry announcement some spotlight time at the top of the page, but here’s the companion to that earlier post featuring Emilien Rotival‘s art.

In this one, we’ve got one more comic-style drawing, which is primarily a showcase for a vector-version of our logo; Emilien helped me out here because although the pixel version of it was entirely my work, I’m honestly quite rotten at vector stuff at the moment. I have so little experience with vector-tools that doing anything is a struggle, and I just don’t have the time to figure it out when there are much more pressing things to finish for the core game (I’ve already got several “learn a new skillset” jobs on my plate related to programming). He vectorized the logo, which gets us a nice, crisp, professional-looking one now, rather than later. Thanks, man!

The centerpiece, though, was a big “poster/box-art/desktop” style drawing he made for us:

It’s awesome to get fan art like this – and we’re open to fan art from anyone. If you’ve got fan-art you want to send, by all means, send it in! We’d love to see more, and if people send more in, we could make an ongoing series out of this. 😀

FacebooktwitterredditmailFacebooktwitterredditmail