

The C++ Standard Template Library (STL) contains a powerful set of data structures and algorithms. However, they are often misunderstood. I think to be an effective C++ programmer, one has to understand how the STL works, and so today I’m blogging about how its most commonly used component, vector, works. My explanation is more oriented toward the practical, and typical implementations, rather than the weird corner cases that the C++ Standard might allow.
What is a vector? It is a dynamically allocated array of elements. Whenever you want an array in C++, a sequence of elements, vector is probably what you want to use. However, this post isn’t meant to be too remedial. I’m going to assume you’ve used a vector once or twice before, and step in to show you how it works, under the covers. Once you understand vector thoroughly, it is much easier to understand the operation of other C++ components.
Let us take a simple example:
vector<int> v;

v.push_back(4);

v.push_back(3);

v.push_back(8);

v.push_back(5);

v.push_back(2);
There, we started off with an empty vector of integers, and then added some numbers to the vector. Now let’s look at how the vector represents this in memory:
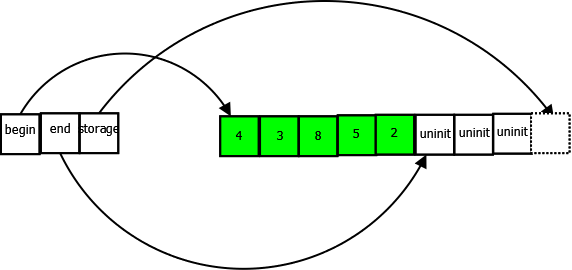
On the left, we have the actual members of the vector object itself, three pointers, begin, end, and storage. On the right we have a dynamically allocated buffer that the vector stores its data in. It’s important to understand what these three pointers are, so I’ll explain them:
- begin points to the start of the buffer. It is fairly easy to understand. You can get it using the begin() member of vector.
- end points to one past the end of the valid, initialized elements of the vector. Note that it points one past the end, making it so that end – begin = size. You can retrieve the end pointer using the end() function and the size() function is the same as evaluating end() – begin().
- capacity pointers to one past the end of the buffer. The dotted square in the diagram above represents this position: one past the end of the buffer, and not a legal part of the buffer. It tracks how much room for growth the vector has in its current buffer. The capacity() function gives you the size of the buffer. i.e. capacity – begin.
Note carefully the pointers that point one past the end. This is a common idiom in C++ and the STL in particular.
Note that a vector always has exactly one buffer that it stores all data in. (Exception: an empty vector won’t have any buffer at all). Note how we have put five integers in our vector, but the buffer has room for up to eight. Each time we call push_back(), adding a new element to the vector, the end pointer will move one step forward.
What happens when our buffer runs out of space to store new elements? A new buffer will be allocated, twice the size [1] of the old buffer, all of our elements will be copied into the new buffer, and then the old buffer will be destroyed. Suppose on our vector from above we now made the following calls:
v.push_back(9);

v.push_back(10);

v.push_back(12);
Here is what our vector looks like now:
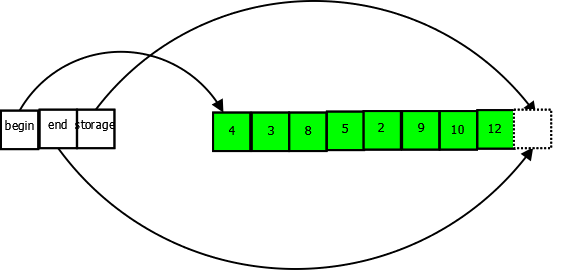
The vector is now at full capacity, end == capacity. The vector cannot perform another push_back in the current buffer. But suppose we push_back() nevertheless:
v.push_back(1);
The vector will allocate a buffer of size 16, and copy all elements to the new buffer, releasing the old buffer.

This process can, of course, continue indefinitely. A vector can grow to any size, constrained only by available memory and addressability.
Now, let’s talk about performance for a moment. Intuitively, to many people, vector is not very efficient. Every time its buffer runs out of space, it has to copy all of its elements over, and this means if you’re adding a lot of items to your vector you’re going to do a lot of copying of buffers, and this is going to be terrible for performance, etc etc.
In actual fact, it’s not nearly as bad as most people intuit. To begin with, let’s think about how many elements the vector will be unnecessarily copying. Suppose you grew a vector to the size of 1024 elements, your vector’s buffer would be full. Now add another element, and the vector has to copy its buffer of 1024 elements over. Additionally, on the way to growing to size 1024, you had to copy as many as 1 + 2 + 4 + 8 + 16 + 32 + 64 + 128 + 256 + 512 = 1023 elements. So, to grow to 1025 elements, the vector has to make as many as 1023 + 1024 = 2047 element copies in overhead. More generally, if you grow your vector to size N, the vector might be making as many as 2*N element copies when it reallocates buffers, and on average will make 1.5*N such element copies. Note that the key to all of this is how vector grows exponentially. If you implemented vector by simply adding, say, 128 elements to its buffer every time it has to resize, instead of doubling its buffer, then the number of copies and performance would be terrible.
Is this really very bad? Actually, almost certainly not. Unless you are storing a bulky object that is expensive to copy in your vector, the copying overhead is likely trivial in comparison to the performance benefits of vector.
Formally, calling push_back() on a vector runs in O(1) amortized time. What does the amortized bit mean? Usually if you push_back() on a vector, it’s a trivial operation, that is clearly O(1) time. But occasionally it has to resize its buffer, and that takes O(N) time. However, if you amortize the cost of the buffer resize over subsequent operations, the average is still O(1) time. This generally means you can consider a vector’s push_back() to take O(1) time, however, there are occasional cases where it could hurt you. Suppose you were storing a huge vector — to build up a record of a player’s stats for instance — and suppose this vector was appended to every game cycle. Once it grew sufficiently large, the push_back() might actually take a significant amount of time. This might cause occasional delays in gameplay. In such a case, it would be a good idea to use another data structure, such as a deque. This problem is very rare in practice, though.
This does bring us to an important topic though: What should you store in a vector? Built-ins like integers can be stored easily, of course. But what about objects of class type? Suppose you are programming a particle system and have a particle class, and want to store a long list of particles, what is the best way to do it? One way is to store a vector<particle>, another is to store a vector<particle*>
— that is, don’t store the particles themselves directly in the vector, but store pointers to particles.
How do you choose which? Generally, the larger and bulkier the object is, the more likely it is you want to store pointers to it, rather than the object itself. Storing a vector<int*> would be very inefficient, since the pointers would be as large or larger than the integers and you’d have to have the overhead of the memory allocations too. But for a large object, like Frogatto’s custom_object class, a vector<custom_object*> is probably what we want. Note that to store an object directly, it must be copyable, i.e. have accessible copy constructors and assignment operators.
Note also that if you store a vector of pointers, the vector will not manage the memory pointed to by the pointers. If you want the object’s memory to be managed for you, you could use a vector
<boost::shared_ptr<particle> > to have a vector of ‘smart pointers’ that manage the memory they point to.
Now, let’s move on to some more things you can do with a vector. Let’s look at how we would iterate over all the elements of our vector and sum them up:
int sum = 0;
for(vector<int>::const_iterator i = v.begin(); i != v.end(); ++i) {
  sum += *i;
}
Now what is this ‘vector::const_iterator’ thing? Well, an iterator is a concept the STL introduces, intended to generalize the concept of a pointer. A pointer works well for moving over elements, inspecting them, modifying them, etc, but only if your underlying storage is an array — a flat buffer of data. If, in C, you wanted to iterate over a linked list, for instance, you’d likely have to write a loop that looks something like this:
for(node* ptr = list->begin; ptr != NULL; ptr = ptr->next) { ... }
…and then differently again for a data structure like a deque, and so forth. An iterator is a type that looks and behaves like a pointer, providing either all of a pointer’s operations, or at least a defined subset of them. The idea of an iterator is to allow access of members of a data structure using a uniform syntax, regardless of the data structure’s underlying implementation.
Thus, just think of a vector::const_iterator as behaving exactly like a const int* does.
Another important concept to understand regarding vector is known as iterator invalidation. Remember how when we push_back() on a vector, and it runs out of space, it’ll reallocate the buffer? Think about if you had a pointer to one of the elements within the vector. That pointer would now point to the old buffer, the one that has been destroyed.
In C++ terms, calling push_back() on a vector invalidates all iterators into that vector. Once you call push_back() all iterators you have into the vector are unusable, and the only thing you can legally do with them is reassign them to a new value. Reading or writing to the iterators may cause the program to crash, or a host of other nasty behavior.
This effect can be rather subtle. For instance, we had code something like this in Frogatto to detect collisions between objects:
for(vector<object_ptr>::iterator i = objects_.begin(); i != objects_.end(); ++i) {
  for(vector<object_ptr>::iterator j = objects_.begin(); j != objects_.end(); ++j) {
    if(i != j && objects_collide(*i, *j)) {
      handle_collide_event(*i, *j);
    }
  }
}
This code iterates over every object pair to see if there are collisions. Simple enough, right? Now what if inside an object’s collide event it spawns some new objects, and that spawning adds the new objects to the objects_ vector? Then the objects_ vector’s iterators are all invalidated, including i and j. We are still using them in our loops though! To make matters worse, it only occurs if the new objects happen to trigger a reallocation of the buffer.
Note that you can iterate over a vector using indexes, which a lot of people find easier/simpler than using iterators:
for(int i = 0; i < v.size(); ++i) {

...use v[i] instead of *i...

}
This has similar performance, but note it’s less general. You can’t use this approach to iterate over most of the other STL containers. In Frogatto, we have a foreach macro we use for most simple iterations.
So far we’ve covered growing a vector using push_back, and iterating over it. Let’s look quickly at the other operations vector supports:
- pop_back(): This is the inverse to push_back, taking the last element off the vector
- resize(): This lets you change the size of the vector to any size you want.
- reserve() : This changes the capacity of the vector. Note that this doesn’t change the vector’s size, it just changes the size of the underlying buffer, to give more room for expansion of the buffer before the buffer has to be resized. Unlike calling resize(), this doesn’t change the behavior of the program, just the performance.
- insert()/erase(): These operations allow you to add new elements anywhere in the vector, not just at the back. Note however that these operations take O(N) time.
- front()/back(): Convenience operations to look at the first and last element of the vector
Remember that vector represents a contiguous buffer. If you want to erase an element in the middle of the vector, all the elements in front of the erased element will have to be shuffled back.
As an example, suppose you had a vector of particles, and wanted to remove all of the ones that have expired. Do not do this:
vector<particle>::iterator i = v.begin();
while(i != v.end()) {
  if(particle_expired(*i)) {
    i = v.erase(i);
  } else {
    ++i;
  }
}
Note that this code does do the correct thing. erase() will invalidate the iterator being erased, but it will return a valid iterator to the next element. The loop carefully moves over all particles erasing the expired ones. But the performance of this is potentially terrible. Suppose we had a million particles in our vector, and they have all expired. We’ll be doing around half a trillion particle copies, just to empty out our vector!
So how should we do this? There is an algorithm supplied in the STL designed to do exactly that, called remove_if. This is how you do it:
vector<particle>::iterator end_vaild = remove_if(v.begin(), v.end(), particle_expired);
v.erase(end_valid, v.end());
How does this work? Firstly, all of the STL algorithms operate on iterators not on containers. If they operated on containers, you’d have to have a version for each type of container. So, the remove_if algorithm takes an iterator to the beginning, and then to the end of the sequence we want to operate on. It also takes the function to call on each element to see if it is to be removed.
Remove_if efficiently shuffles all elements that should not be removed forward, overwriting elements that should be removed. At the end of the call to remove_if, all the remaining elements are at the front of the sequence. Let us illustrate this with an example, suppose our vector contains particles with the following ID’s:
[4, 8, 2, 12, 19, 3, 7, 18]
Now suppose all particles with ID’s lower than 6 are being expired. After the call to remove_if, our vector will now contain this:
[8, 12, 19, 7, 18, ??, ??, ??]
See how everything less than 6 has been removed. Everything over 6 is now at the front of the vector, with the order maintained. However, the size of our vector hasn’t changed — because remove_if only has access to iterators, and iterators can’t change the size of the vector they point into — now at the end of the vector are some ‘garbage’ undefined values.
Fortunately, remove_if provides a convenience way to resize the vector and remove the garbage. It returns an iterator to the end of the valid values. So we use this iterator to remove all the invalid values at the end, with our erase call.
One final operation vector has which I want to talk about is swap(). You can call swap() on two vectors and they will be efficiently swapped. That is, they will simply swap the pointer values they have. This is useful in a variety of situations, for instance to ‘move’ a vector into a new location without the expense of a copy. Also, we have discussed the way a vector grows its buffer. Yet if you call shrinking operations such as resize() with a smaller value or pop_back() or even clear(), a vector never shrinks its buffer. So if you call push_back() a million times on a vector, then call clear(), the vector will still hold a huge buffer of memory. This is probably a reasonable decision, since any shrinking would risk pathological situations where a vector keeps growing and shrinking its buffer. However, it is useful to be able to shrink a vector by hand. Here’s a way you can manually clear a vector, so it has no buffer at all:
{

vector<int> tmp;

tmp.swap(v);

} //tmp is destroyed here, taking the swapped buffer with it.
There’s a lot more to understand about vectors, and all their implications. Hopefully this gives a good overview. Unless you have a very good reason not to, vector is generally the best container to store things in in C++. It is efficient and compact, and generally gives the best real-world performance of any container.
[1] Actually, the C++ Standard only requires that a vector grow exponentially, it doesn’t specify the exponent. So a vector could make its new buffer four times the size of its old buffer, for instance, or one-and-a-half times. But all implementations I know of double it each time.
![]()
![]()
![]()
![]()
![]()
![]()
![]()
![]()


