Gravity and Collision Detection
Last time, we made our hero, Elisa, and gave her a basic slashing animation. Since we’re making a platformer, we’d really like Elisa to be subjected to gravity, and to be able to land on and walk on the ground.
The simplest way to represent gravity is to give objects vertical acceleration. The simplest way to do this is on a per-animation basis. We can add this to each animation:
accel_y: 80
This gives the object acceleration of 80 milli-pixels per cycle^2. The acceleration is set when the object enters the animation. We could also use FFL to set an object’s acceleration in any event, such as by using set(accel_y, 80).
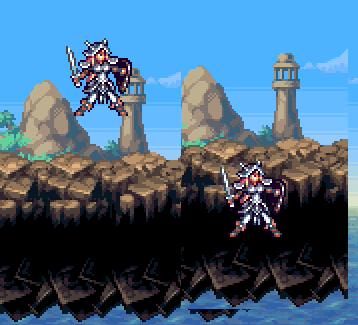
Using this code, I make a little level, containing Elisa, with some ground tiles beneath her. She falls, but she doesn’t have any collision detection logic yet, so she falls straight through the tiles!

Elisa is an object that should be solid. We want her to land on ground tiles, and not be able to walk through them. There is an additional problem with Elisa’s animations from last session: her animations are of different sizes. The game engine keeps the upper-left corner of the object in the same position, but this causes her to jerk forward when slashing.
Both these problems are solved by giving her a solid area. This is specified by specifying a rectangle in [x1,y1,x2,y2] format in each animation:
solid_area: [16,10,32,50],
This specifies the area within the frame which is solid. Naturally this is calculated by loading the image into an image editor and looking at the appropriate co-ordinates for the solid rectangle for an animation.
Once I do this, I start the game, and Elisa falls onto the platform and stands on it! That was nice and easy.
What is important is that we make a solid_area for the attack animation which is the same size as the standing animation, but with the position adjusted appropriately. Frogatto has a notion of an object’s “feet”, which is a pixel position within each animation that is the anchor-point for the animation. The feet of an object are found in the bottom middle of its solid rectangle. This is the point with which it collides with the ground, and the point at which animations are anchored. When an object changes its animation, the feet remain the same place, as does the solid area (assuming the solid areas are the same size for each animation).
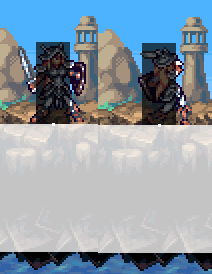
We can run the game with the –show-hitboxes option to see the collision area for Elisa:

Perfect — Elisa will now fall, until she lands on a surface, which she’ll stand on. Here is the full code listing:
{

id: "elisa",

is_human: true,

editor_info: { category: "elisa" },

on_end_stand_anim: "set(animation, 'stand')",

on_end_attack_anim: "set(animation, 'stand')",

on_ctrl_tongue: "[set(animation, 'attack')]",
on_process: “if(ctrl_left, set(x, x-2))”,
animation: [
{
id: “stand”,
image: “characters/elisa-spritesheet1.png”,
rect: [4,4,57,57],
solid_area: [16,10,32,50],
pad: 3,
duration: 5,
frames: 3,
reverse: true,
accel_y: 80
},
{
id: “attack”,
image: “characters/elisa-spritesheet1.png”,
rect: [5,180,93,240],
solid_area: [26,16,42,56],
pad: 3,
duration: 5,
frames: 6,
frames_per_row: 3,
accel_y: 80
},
]
}
That is all for today’s lesson. Next time I intend to show you how you can make Elisa walk and jump, and in doing so we’ll step more into Frogatto’s event handling mechanisms, and learn more of Frogatto Formula Language.


I did learn a couple important things there. Again Sirp, thank you very much!. I’ll be surely following these tutorials 🙂
[…] Next Page ↑ Table of […]
Do not stop making these tutorials!
I have been eyeing the Frogatto engine for a while but the lack of documentation or tutorials has been keeping me from trying to use it or something fun.
This writing is exactly what I was looking for.
This is sexy stuff!
I’m looking forward to much more of this! I feel like in a few more posts like this I’d be able to do a full game.
On a side note, I think I spot a little bit of “move left” code in there. 🙂
If you’re got a relatively recent development build of the frogatto engine, or you build the game from git yourself. You can press ‘h’ in the editor or select “show/hide hit boxes” from the menu to toggle showing the debug hit boxes. No command line options needed anymore.